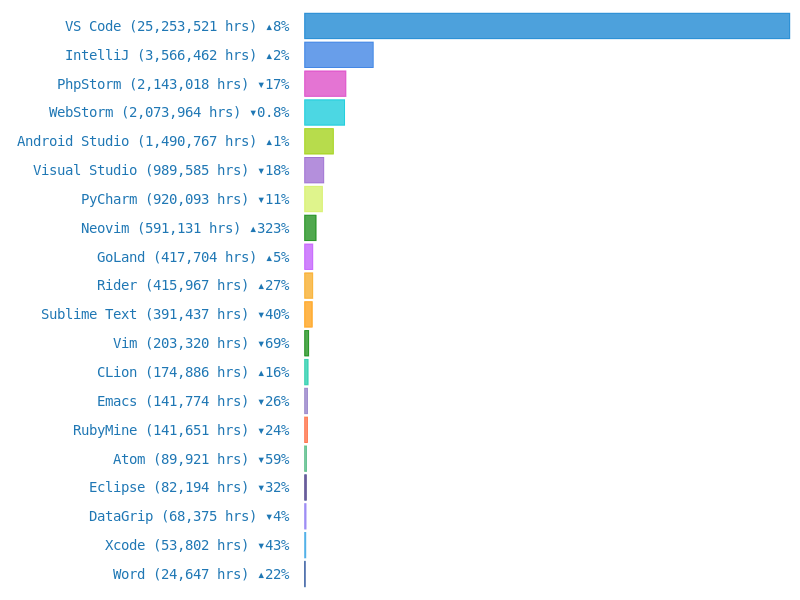
Welcome to our next post! :-) Today’s topic is a very prominent code editor: Visual Studio Code (VS Code). According to Wakatime, VS Code was by far the most used code editor in 2022 (see the chart below). And that’s for a reason! VS Code offers a rich feature set at a high degree of customization. By the way, this post is written using VS Code ;-) First, we want to discuss different kinds of editors. Then, we show you how to install VS code step-by-step. As a benefit, we provide you our custom settings.

Editors & IDEs
Nowadays, simple editors that only offer text editing are super rare. Even tiny editors have features like syntax highlighting and autocompletion. Syntax highlighting highlights keywords of a programming language. Soon, you will notice that it is much easier to read colorized than simple black-and-white code. Autocompletion is a handy feature: Imagine you define a variable and want to use it later. Once you start typing the first letters of the variable, it is automatically completed. That saves a lot of typing.
In general, there are two types of editors. Terminal editors like Vim or Nano are the first type. As you might guess from the name, they run directly in the terminal. Their advantage is that they are very lightweight and run even on less powerful processors. Also, they don’t use GUI elements, which can be beneficial if you want to edit files remotely on a machine without a graphical interface (like a server). One downside of terminal editors is that they are typically not convenient to use as a beginner.
Besides terminal editors, there are graphical editors for a more intimate user experience, which are often called IDE (Integrated Development Environment). IDEs offer everything you need for development, such as build automation and a graphical debugger. We will demonstrate this in upcoming posts. Since editors became very powerful over the past years, the distinction between an editor and an IDE is often unclear.
Some IDEs are specific to one programming language. For example, in the chart at the beginning of this post, you can find PyCharm, which was developed for Python. Over time, IDEs that target multiple (or nearly all) purposes, such as Atom or VS code, became very popular. Usually, they come as a very basic IDE, and extensions allow the user to tailor the editor to suit their needs. We will install extensions for VS code later in this post. In addition to extensions, nearly all editors offer a high degree of customization. You can change colors, add shortcuts, and much more. We will provide you with our own customizations as a starting point. But most likely, you will find your own customizations over time.
What else can you expect from a good IDE? Indexing is very useful for larger code bases. Imagine your code has more than a thousand lines divided over multiple files (which is not unrealistic!). You want to see the definition of a used function. One way would be to search all files for the function, but if the function is used multiple times across different files, searching is not a very convenient way to find the function definition. This is where indexing comes in. Because the IDE indexed all code, it knows where the function definition is and can directly open it for you. So, indexing can be described as generating an address book of all variables, functions, types, and so on. Another cool feature is Linting. Linting checks your code while you type. It can detect errors like a typo in a variable right away. Don’t worry if you don’t have a picture of these features yet. It will become clear once you start coding.
Now, let’s get started and install VS Code!
Installing VS code
In previous posts, we demonstrated how to install programs using Pacman. Here, we want to use something else called Snap. Feel free to read this Wikipedia article to learn more about it. Why don’t we use Pacman? Simply because Pacman doesn’t provide VS code. If you want to get installation instructions, it’s often a good idea to visit the program’s homepage.
First, we use Pacman to install Snap:
sudo pacman -S snapd
Snap is a system service that runs in the background. We have to enable it:
sudo systemctl enable snapd
sudo systemctl start snapd
Finally, we need to create a link:
sudo ln -s /var/lib/snapd/snap /snap
Sounds all like black magic to you? Well, often it does for us as well :-D Let’s keep things simple here: If you want to install something, you will find instructions with the help of Google.
Before we can install VS code, we have to reboot the computer. This ensures that everything is set up correctly for Snap to work. Install VS code:
sudo snap install code --classic
That’s it!
Starting VS code for the first time
You can run VS code either from the application menu in Manjaro or from the terminal:
code &
Once VS code is started, you see a Welcome screen, from where you can directly create files and start coding. But let’s deal with some settings first. On the left bar, you can see several icons. If you hover over them with your mouse, you get some explanation.
Let’s start with the fifth icon from the top, which is labeled Extensions. Once you click on the icon, you can look for extensions on the marketplace. Good extensions can improve your coding experience a lot. So, it is wise to spend some time to find the extensions that meet your needs. But since it is hard to know your needs as a beginner, we prepared you a list of our favorite extensions. Before we show you how to install them, click on the gear wheel icon at the bottom and select Settings. Here, you can customize almost everything: Colors, cursor styles, auto-saving, and much more. When you have time, it’s worth checking out what is possible. But since we want to get coding fast, we will share our settings with you.
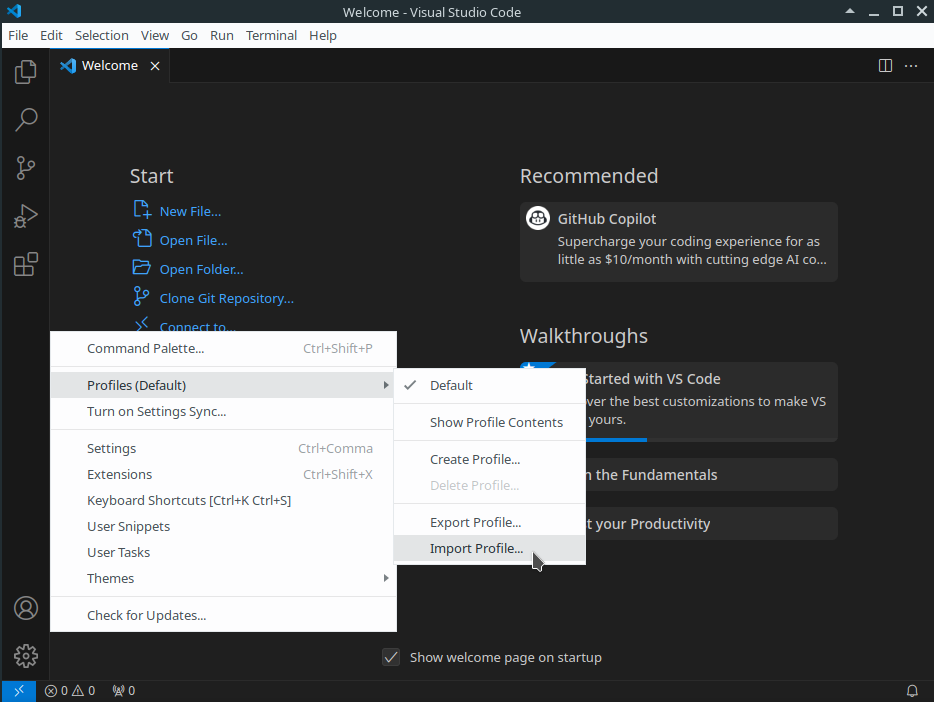
VS code supports so-called Profiles. Profiles store extensions and settings. It’s possible to have multiple profiles to target different projects. For example, you might have one profile for Python and another one for web programming. It is also possible to export/import profiles, so it’s super easy to share settings with friends and colleagues. From our Getting Started repository, you can download our default profile. Click on the gear wheel icon and select Profiles -> Import Profile, as shown in the image below. Select the file you downloaded from our repo and import everything. It will take a moment to download all extensions. Note that we might update our profile from time to time.

Once everything is installed, you can find new icons added by extensions. If you are interested, you can again click on the extensions icon. Now, you can find a list of installed extensions. You can click on each extension to read what they are for. We will explain further features of VS code when we use them in our upcoming programming posts.
Summary
We hope you were able to install VS code :-) Let’s summarize a few things:
- There are terminal editors and IDEs
- Some IDEs are specific to one programming language
- Some IDEs can be used for multiple languages
- Extensions add further functionality to VS code
- VS code supports profiles to switch between different settings
- We introduced several IDE features: Syntax highlighting, autocompletion, indexing, and linting
In our next post, we will start with our first programming language: Python :-) See you soon, and don’t forget to follow us on X (Twitter).
Back to top ↑