- Manjaro: 21.0.7
Welcome back to our second post of the Getting Started category. We hope you have your Linux machine running by now. If not, just go back to the previous blog post. Before we begin with our next topic, the Terminal, a few notes about the two boxes you see above. It is our goal that everyone can follow along with our posts. That’s why we try to provide links to knowledge that we require in the post. If you lack any knowledge, don’t worry. Just use the recommended resources to fill the gap before you continue. For the following post, it is not much required. Just a running Linux machine. The second box lists the version of the software that we use for the post. It does not mean that you have to use the exact version as we do. Use the one you have installed. However, sometimes the appearance of software changes with a new version. So, if you use a different version, things might look slightly different compared to the description in our post. For the following post, you should not have to care about it. Shall we start?
Communication with a Computer

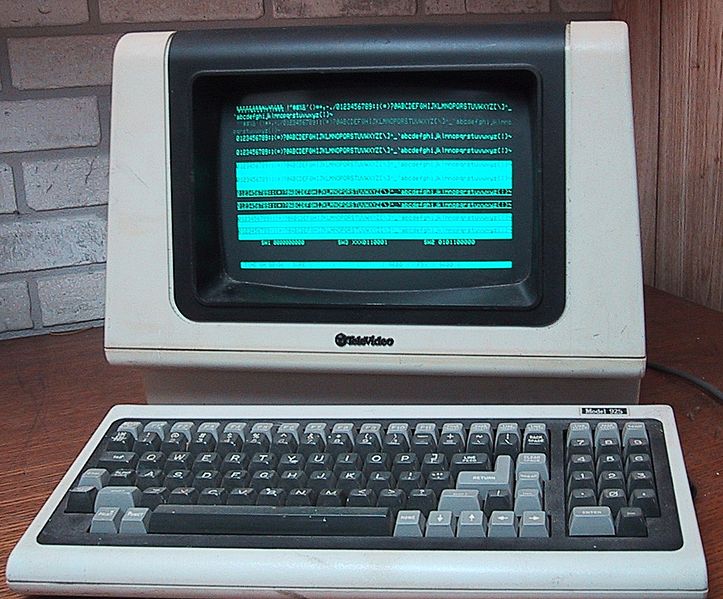
Early computers came without a graphical interface like you are used to today. Nowadays, you have a mouse and you can click on buttons to open a browser, use a calculator or control your music. This was not always possible. In the beginning, there was just a keyboard and a monitor. You could send text commands via a terminal to the computer and receive an answer. There was also nothing like a background image. It was just text on a black screen. This historic terminal is still commonly used among computer developers as it provides many advantages compared to a graphical interface. Though, the terminal has been greatly developed over the years, so that it is not really comparable to the one the first computers had. The basic concept, however, remains the same. Often, the terminal is also referred as console. While terminal and console was something different back then, today it is mostly used interchangeably. In the upcoming post, we will cover basic commands you can use to control your Linux machine.
Open a Terminal

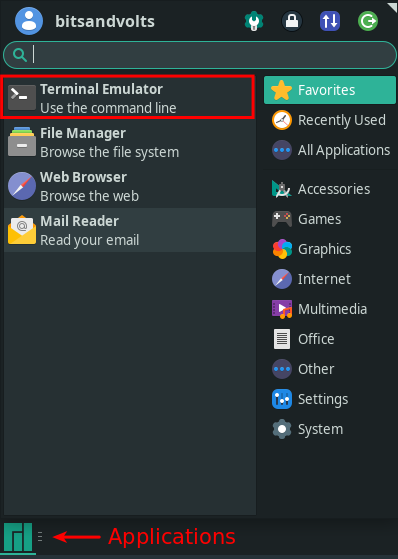
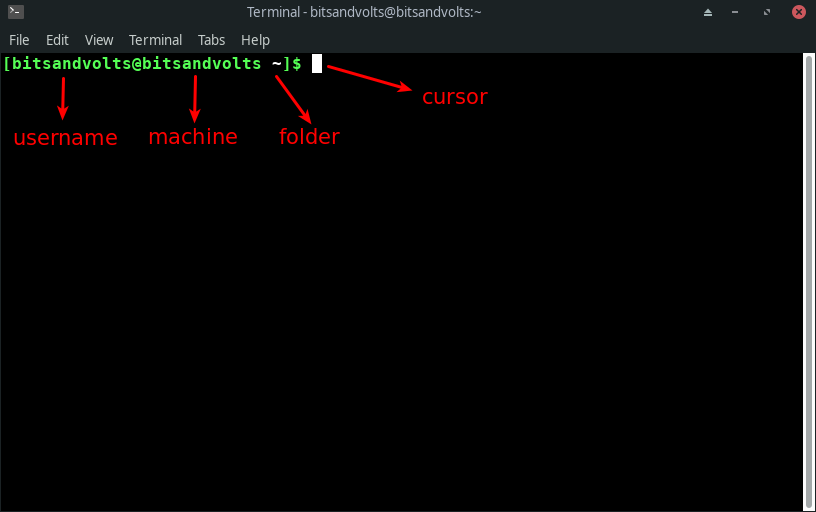
Before we start with the actual commands, we have to open a terminal. Therefore, click the “Applications button” in the lower-left corner of your screen. Then, select the Terminal Emulator. A black window with green text and a white cursor should appear. The first part of the text is a combination of your username and the name of the machine, that you chose when you set up the computer. In our case, it is both “bitsandvolts” but, of course, we could have named it differently. Second, you can see a “~” that tells you that the current folder is your home directory. We will come to this in more detail shortly. Last, you see the cursor where you soon will enter your first Linux commands.
One note about the terminal settings: When you press “Edit->Preferences..” you can change the appearance of the terminal. If you do not like the transparent background you can go to the “Appearance” tab and select “None (use solid color)” as background. If you change to the “Colors” tab you can select the color of the text and background. Many people we know prefer a black background and either white or green text. Some prefer black text on a white screen. We prefer the dark background as it feels more comfortable for the eyes, especially in the evening. Just try a few different settings and find out what’s best for you.

Since the terminal is used very often, it is convenient to use a shortcut to
open it. Again, click the “Applications” button and search for “Keyboard”. Open
it and switch to the “Application Shortcuts” tab. Add a new shortcut command and
enter:
exo-open --launch TerminalEmulator
Select a
shortcut of your choice but avoid commonly used shortcuts as CTRL-C, CTRL-V, or
CTRL-S. A good choice could be CTRL-T (T for Terminal). Close the Keyboard
window and try to open a terminal using your previously added shortcut.
Basic Commands
Learning to master Linux and its programs with a terminal is like learning a new language. There seems to be an infinite number of commands and very often there are multiple ways to reach a goal. Therefore, it can be very overwhelming at the beginning. The good news is that there are very few commands that can do almost everything you are used to do with a graphical interface:
- navigate between folders
- create/move/copy/remove files and folders
- search for files/folders
- install and deinstall software
- run software
The best way to get used to the terminal is to actually use it and practice the commands. So, let’s get started with the first two points in this blog post. The other three points will be explained in an upcoming post.
Navigation
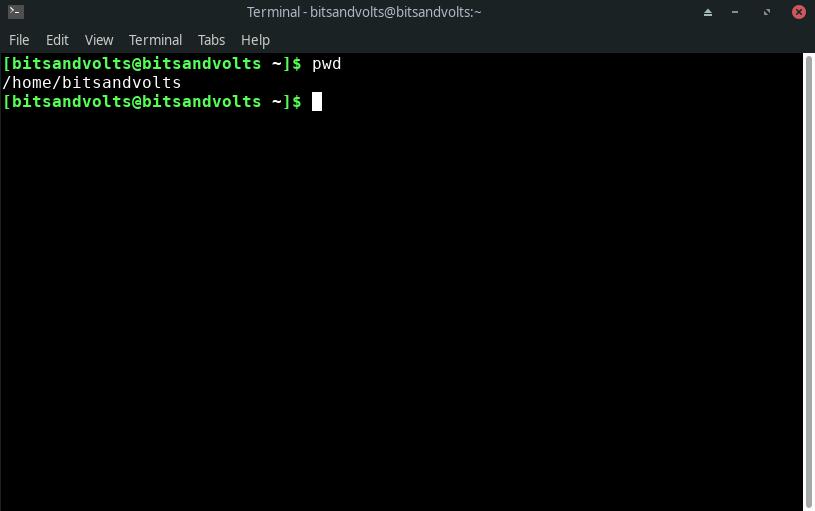
When you open a file explorer in a graphical interface, it will open a default folder. The same happens if you open a terminal. To find out which folder will be entered by the terminal, you can use the “print working directory” command, that outputs the folder you are currently in:
$ pwd
Note: The “$” here just indicates that the command should be executed in a terminal. So just insert “pwd” and hit the return key.

After you executed the command, you should get something like “/home/your_name” as response. Per default, the terminal is opened in your Home Directory. A computer can be shared by multiple users and every user gets its own directory. We will talk about access rights in a later post, but it might be obvious that you are not allowed to work on other people’s files (unless it is explicitly allowed). For now, you can remember that everything that is under your home directory belongs to you and you can freely change it. Let’s see what is already inside your home folder with the “list” command:
$ ls
You should see some predefined folders as Desktop or Downloads. Use “change directory” to switch to the Desktop:
$ cd Desktop
Verify that the switch succeeded and your working directory changed. Then, check if there is anything on the desktop:
$ pwd    # should be /home/your_name/Desktop
$ ls     # should not list folders on your Desktop
When you executed the “pwd” command you might have noticed that the reply was “/home/your_name/Desktop” while you entered just “cd Desktop”. The reason for this is that there exist so-called relative paths and absolute paths. The former is relative to the current working directory. The latter is the complete system path. So, when you were in your home directory “/home/your_name” and typed “cd Desktop”, you changed relative to your home directory. If you try to execute the same command again, it will fail because there is no Desktop folder in your current location “/home/your_name/Desktop”. If you use the absolute path, it will work:
$ cd Desktop                    # fails, if not in your home directory
$ cd /home/your_name/Desktop    # works
Note: The absolute paths always starts with a “/”.
In general, you can use both path types. Usually, you prefer the one that is shorter to type.
There are some special folders: The current folder “.”, the upper folder “..” and, as mentioned earlier, your home directory “~”. There are two more things you should know about the “cd” command. First, if you use “cd -“ you change to the last folder you visited. Second, if you execute “cd” without any command you will change to your home directory. Try the following examples:
  $ cd                  # change to your home directory
  $ cd ~                # change to your home directory
  $ cd Desktop          # change to your Desktop
  $ cd -                # change to the last folder (here: home directory)
  $ cd ./Desktop        # same as "cd Desktop"
  $ cd ../Desktop/..    # Can you guess? Verify with "pwd".
A few notes to make things faster for you. If you press the arrow-up key you can reuse your previously used commands. With CTRL-R you can search in your command history. Just play around with it, but in the beginning, we recommend typing the commands yourself. Especially, because the commands pwd, ls, and cd are faster to type than to search for in your history. If you are a lazy typer, you also can highlight a command, for example, in your web browser and paste it into the terminal by pressing your mouse wheel.
Play with files and folders
Next, we want to show how to deal with files and folders. You can create a file using the “touch” command with the file name as a parameter:
$ touch my_first_file
List the content of the current folder and you should see the newly created file (Can you already recall the correct command?):
$ ls
To create a folder, you can use the “make directory” command:
$ mkdir new_folder
Again, you can use the “list” command to see your new folder. Let’s copy the previously created file into the new folder:
$ cp my_first_file new_folder
From the example, you can see that the structure of the command is:
$ cp source destination
So far, we only used the “list” command to show the content of the current folder, but you also can list the content of other folders. In this case, we want to check if the file was really copied to “new_folder”:
$ ls new_folder
Similar to copying a file, you can also move the file:
$ mv my_first_file new_folder
Here is one thing you should note! There is already a file named “my_first_file” in “new_folder”. What will happen now? In a graphical interface, you usually will be asked if you really want to replace the existing file. If you try the command above, you will notice that this is not the case here. The existing file will simply be overwritten without notice.
Attention: Stupid usage of the terminal can lead to loss of important data
Lastly, we want to remove the file. Since we are lazy programmers, we do not want to type the whole path ourselves. Let’s use autocompletion by pressing the TAB key:
$ rm nTAB mTAB # press the TAB key after typing n and m
Because there is only one folder with one file in it, “n” should expand to “new_folder/” and “m” should expand to “my_first_file”. The complete command should be:
$ rm new_folder/my_first_file
Attention: The file is completely deleted and there is no way (at least no simple way that always works) to get it back
Another command that is often useful when dealing with files is “concatenate” which reads the content of a file. At the very beginning of this post, we mentioned the Manjaro version that we used for this post. However, we never explained how to check the version on your computer. The version of your release is stored in a file that we now want to print:
$ cat /etc/lsb-release
The output should be a few lines describing your Linux distribution. Got it? Before we start with a few more notes, try to solve the following exercise.
Exercise:
- Change to the directory “new_folder”.
- Create the files “aaa”, “abb”, “acc”, and “ccc”.
- Remove the file “aaa” using autocompletion. How many letters do you need to type until it expands to the full name? If you just typ “rm” and press two times [tab], all possibilities will be listed.
- List the remaining files
A few more words
Let’s take a deep breath. So far, we learned the following commands:
pwd, ls, cd, touch, mkdir, cp, mv, rm, cat
Sounds not too much, does it? Don’t worry! There won’t be further commands in this post. Just a few more hints and options. Shall we?
After the exercise above, there are still three files left: “abb”, “acc”, and “ccc”. Let’s assume you want to remove all files beginning with an “a”. Of course, you can delete them one by one, which is not too hard because there are only two files. But imagine there are hundreds of files starting with an “a”. Then, this is not really an option, is it? The solution is the following command:
$ rm a*
This is called a regular expression. There will be an extra post about it. The “*” is kind of a placeholder for everything possible.
Real-life Example:
When you develop software, you often want to store intermediate states or log some information. This can, for example, help to understand why the software does not run as expected. After a while, however, this might eat up your storage. Let’s say you store the files with a “.log” ending. Then, you can delete all log files using:
$ rm *.log
Warning Example:
Let’s assume you want to delete the content of the whole directory using:
$ rm *
However, by accident you are not in the folder you think you are. Then, every file in that folder will be lost. This can happen faster than you think. Imagine you want to change the directory, but accidentally you were typing too fast and pressed return before entering the folder name. Then, you will change to your home directory. So, be super careful when you delete something!
Another thing we didn’t mention so far is command options. In the examples above we only copied and removed files and no folders. This has a reason. If you are still inside “new_folder” go one level up and try to delete the folder (do not forget to use autocompletion):
$ cd ..
$ rm new_folder    # fails
You will get a warning and it will not succeed. Per default, “rm” only works on files inside one folder level. You can add an option to recursively remove a folder with all sub-folders:
$ rm -r new_folder
Warning Example:
The last warning example was nothing compared to what happens if you execute
$ rm -r *
in your home directory. After this, your home directory will be empty. Then, it’s time to pray that your last backup is not too old.
If you want to get more information about commands and their options you can use something called man page. This page explains what a command does and how you can use it. Open the man page of the “rm” command using:
$ man rm
Note: Press “q” to exit the man page.
Some commands also offer a help message with information about the command’s usage.
$ cd --help
Exercise:
Often a verbose mode is offered, which displays more information while the command is processed.
- Create a folder named “test” with a file “test_file” inside.
- Check the “rm” man page. Which option does activate the verbose mode?
- Remove the folder “test” using verbose mode.
Summary
We summarized the commands in a cheat sheet, that you can find in the GitHub repository of the Getting Started category. We put a lot of work and energy into our blog posts and the additional material, so please respect our terms of usage. Besides the commands you’ve also learned:
- Every user has a home directory “/home/user_name”
- Differentiating between absolute and relative paths
- There are special folders: “.”, “..” and “~”
- Use the arrow-up key or CTRL-R to search your command history
- Highlight a command and paste it into the terminal by pressing the mouse wheel
- Tab triggers autocompletion
- ”*” is a placeholder
- Description of a command is stored in its man page and/or help message
- Deleted files will be lost! Take care especially in combination with “*”
In Terminal Basics II, we will deal with search options and running software. Stay tuned and don’t forget to follow us on Twitter!
Back to top ↑